Anatomy of a 10-game Revolution (Part 1) – Stoke’s New Blueprint

Part 1 – Sustainability and off-the-ball principles

‘Oh great, another tactics piece that goes on way too long’ I hear them cry.

‘Here he goes, getting carried away again’ the haters say.

Well they’re damn right, strap yourselves in for another lengthy profile of the new-look Potters of February 2023 to March 2023 (and beyond?).

Edit – This piece has turned out to be a lot longer than I imagined, so it’s now split into two parts! This is part 1, looking at sustainability and off-the-ball work. Part 2, looking at build-up and chance creation, is available at this like when you’re finished with Part 1! Anatomy of a 10-game Revolution (Part 2) – The On-Ball Boogaloo

An Unexpected Turnaround

It’s a month and 2 days (providing I release this when I intend to) since Stoke fans serenaded the team with chants of ‘you’re not fit to wear the shirt’ after a last minute loss at home to Preston.

Just 2 league games later, Stoke were thrashing Reading 4-0, and despite a few lulls, there have been increasingly positive signs ever since. This has culminated in a run of form that has seen Stoke take 11 points from a very difficult 5 games, scoring 13 and conceding just 4.

Now on these small timescales, many teams can go on these runs of form due to variance (in effect, luck), in finishing outcomes, goalkeeping outcomes, refereeing decisions, or other unsustainable factors.

Interestingly (and excitingly) for Stoke, though, the recent form actually seems to be reflected in the underlying numbers. Let’s take a look at the 10 game rolling average xG per game (taking the average of the last 10 games expected goals, see our explainer article: xG – A Stoke City Explainer!).

We see that Stoke have been consistently improving their rolling xG since the Hull City home game, and have had an average expected goal difference p90 of above +0.5 since the Blackpool away game.

Whilst the quality of these performances may not last forever, it’s heartening to see that the results are backed up by the underlying numbers. This is a big tick next to the sustainability box, and although there are some factors that could shift the balance, such as shifting opposition attitudes towards Stoke, transfers and the return of loan players, and injuries, here at Potterlytics I like to take the positive slant on things.

So what exactly is this newly-revolutionised Stoke side doing differently? What is the blueprint?

Well, let’s combine all we’ve seen over the past 10 or so games together to build a tactical profile.

A Brave New World – Off The Ball

The first big shift we’ve seen is the way Stoke work off the ball. They’ve been relatively high-pressing all season, but in recent weeks this has been taken into overdrive, and the well-oiled pressing machine has even managed to stifle high-flying Middlesbrough in their own back yard.

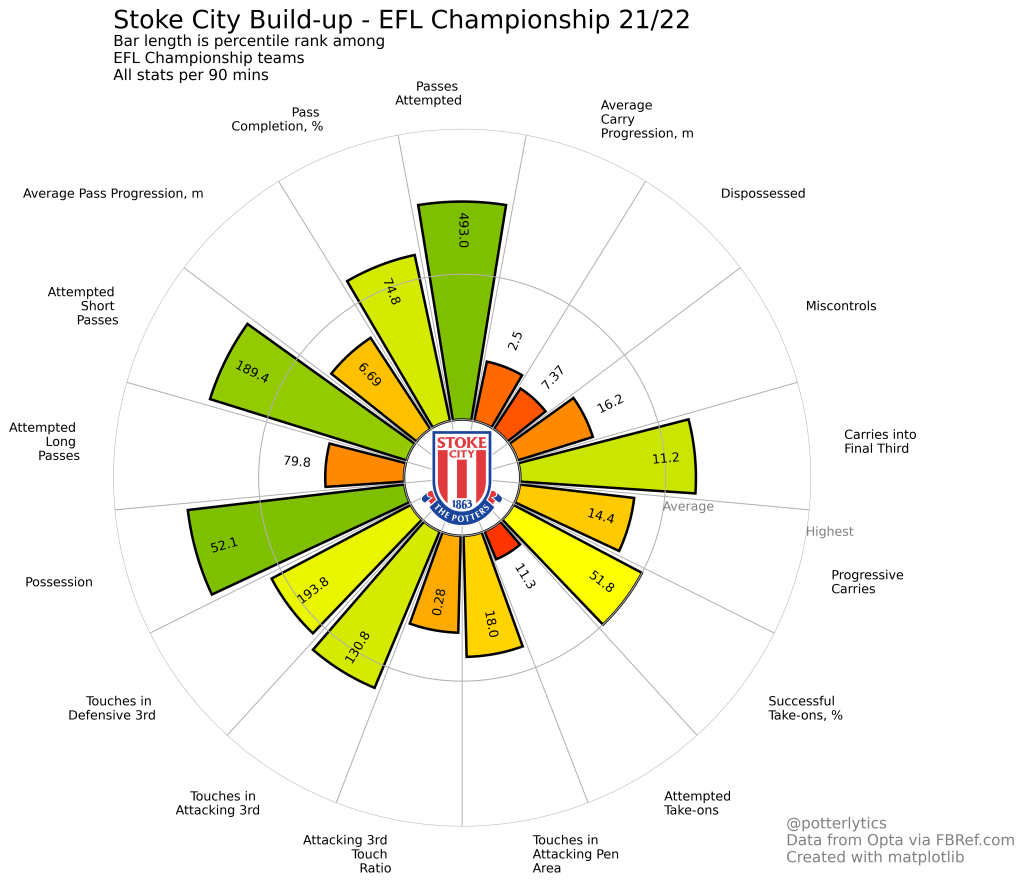
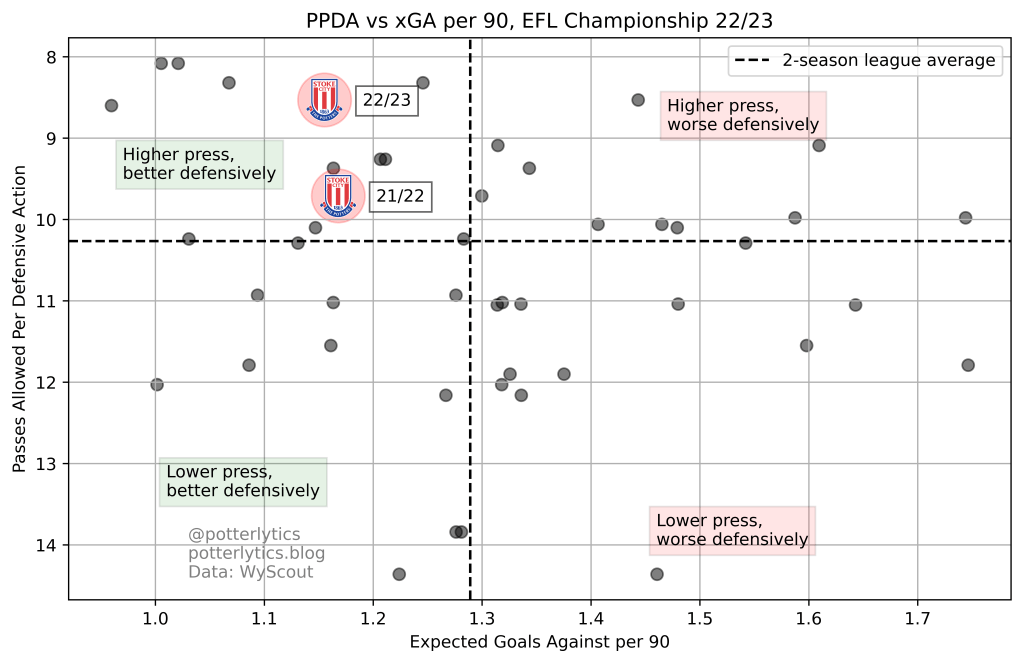
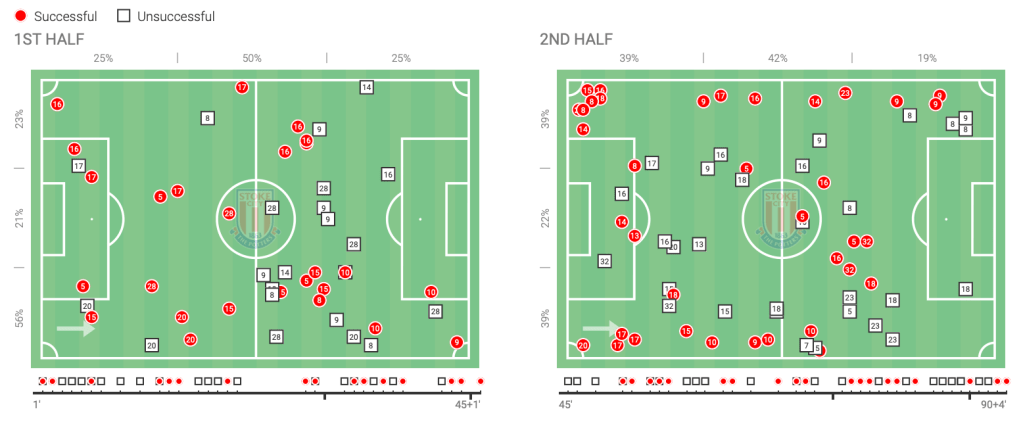
Indeed, looking at the Passes per Defensive Action or PPDA (the average number of passes a team makes before Stoke perform a defensive action, e.g. a tackle or interception), Stoke are one of the most intense pressers in the league.

Remember, a lower PPDA indicates a more intense press.

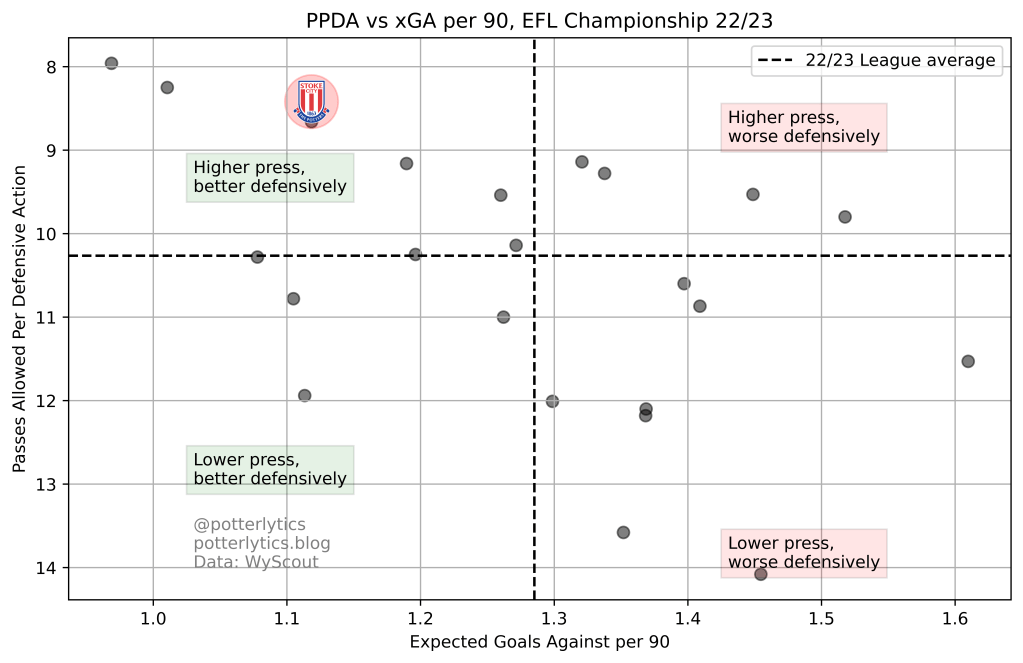
I’ve waxed lyrical already about the quality and efficiency of Stoke’s new pressing unit since the 3-1 victory away at Swansea, but it wouldn’t be a real profile without explaining again how the main press has been working.

So what is the quintessential Stoke City high press? Take a look at the animation below, and let’s go through the plan step-by-step.

A hypothetical realisation of Stoke City’s main pressing plan of the past 10 games.
Click the lines with dots on in the bottom right to slow the footage.

There are 4 main steps in the most basic realisation of the plan.

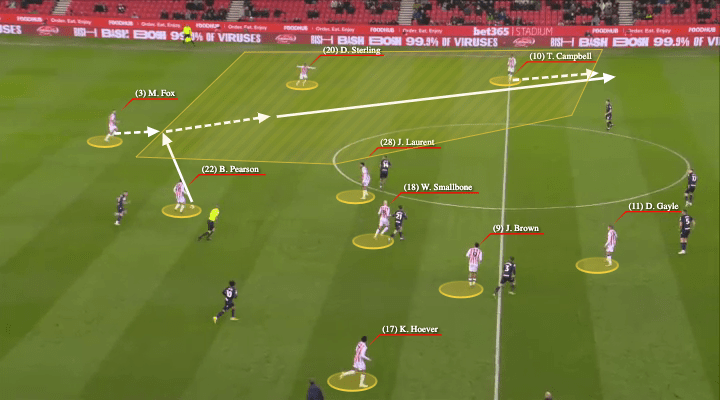
In our theoretical scenario, the opponent is playing a relatively simple 433, with one full back pushing high, and the other dropping inside to help with build-up. This is similar to what we saw from Sunderland. The opposition keeper has the ball, and from here, we see our 4 steps as follows:

1 – The central striker (number 11, usually Gayle, although in his absence this role has gone to Jacob Brown and Nick Powell) makes a curved pressing run towards the ball. The curving of the run cuts off one passing lane for the player in possession, forcing the ball into a specific area, starting the trap. The pass can only go one way, as behind the front 3 all players are closely man-marking.

2 – As the ball gets passed out to the wide to the right, Stoke’s wide left player (in our case, Tyrese Campbell, number 10) triggers his press and closes down the ball aggressively. This forces the opposition centre back (5) to either try to carry the ball past Campbell, or play long. The central striker (11) drops to cover the passing lanes across the box and back to the keeper.

3 – The centre back (5) plays the ball long to the front line, where Stoke’s aggressive man-to-man press is waiting. Josh Laurent (28) steps in front of the waiting opponent and nicks the ball back.

4 – Laurent (28) pushes forward and plays the ball wide to Campbell (10) and Stoke’s midfield and forward line bomb forward to take advantage of the transition.

This shift has made great use of the athleticism and combative nature of the players Stoke have available. The additions of Ben Pearson, Axel Tuanzebe, and Ki-Jana Hoever, and the return to the side of Dijon Sterling and Josh Laurent have given Stoke a side that loves to be active in forcing the opposition to give up the ball.

Even in games where the opposition have clear strengths in attack, such as the game vs Coventry, we saw Stoke trust 40-year-old Phil Jagielka and Ben Wilmot to mark Gyökeres and Godden man-to-man, two strikers who are by no means easy to pocket. Again, bravery is the word of the day!

It’s all well and good looking at it on a tactics board, but how does this work in reality? Players aren’t always going to lump it long straight away, and they may be able to bypass one of those pressing moves if they’re good enough.

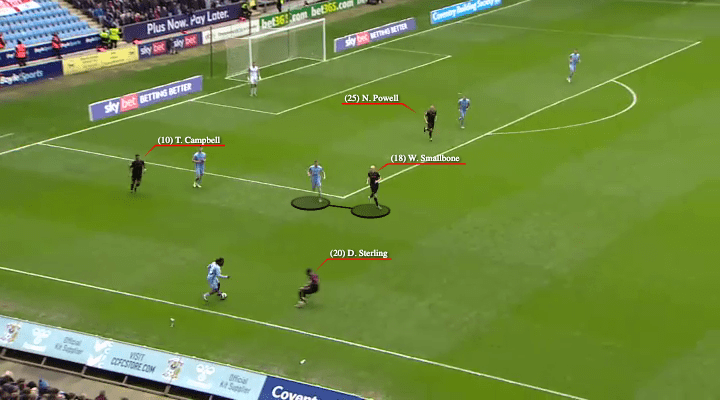
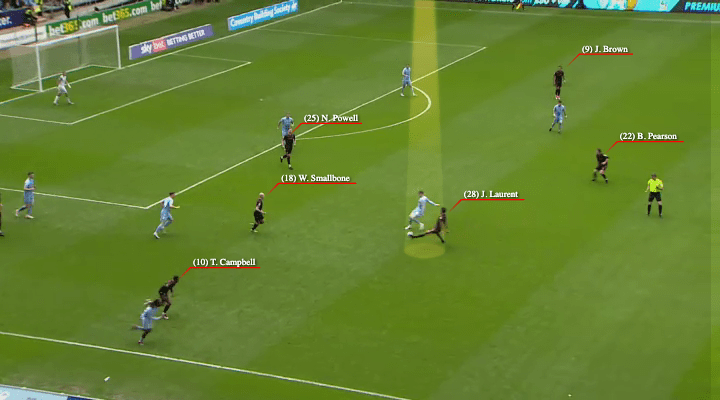
Let’s see some examples of how the press evolves in real games. First up, about 10 minutes into the Coventry away game, and Coventry have a goal kick. As the ball comes back to the keeper we see the press in action.

Click each image to zoom in

In the first frame we see our familiar setup. Powell, playing as the central striker in this game, is blocking the passing lane to the central player, Smallbone is marking the deeper midfielder, and the wide players are sat off the back line, ready for their press to be triggered when the ball comes to their side.

Sure enough, the keeper plays it to the right hand centre back, and Campbell presses the Coventry player as soon as the ball moves out.

Under significant pressure, the opponent plays the ball down the line to the right back, who has dropped deep to provide support.

Click each image to zoom in

As the ball comes out to the right back, Stoke’s left back, Dijon Sterling, bombs forward to continue the press and forces the Coventry player to play the ball inside to a supporting midfielder.

The trap has worked. As the ball comes into the centre of midfield, we see both Josh Laurent and Ben Pearson man-marking the Coventry players. Laurent snaps into the tackle and wins the ball back.

This isn’t necessarily the same in all games, however, and we see a slightly different setup in this shorter clip from the Norwich home game.

A reminder that in this game, Stoke started with a front 3 of Campbell, Brown and Hoever.

Click each image to zoom in.

In this first clip, we see Stoke set up relatively similarly to previous games, but this time Smallbone presses the ball, leaving his man-marking position. As he does this, Brown moves across to cover and pass back across.

As Smallbone curves his pressing run, there is no pass available back across.

Norwich in this game were tactically very interesting, and were in fact told by the manager to go long much more often than they usually do. As evidence, in this game Norwich attempted only 242 passes at a completion rate of 64%, compared with their average this season of 456 passes per game (82.9% completion). They had only 37% possession compared with their average of 57%, and played 18.2% of their passes long, compared with a season average of 10.9%.

As such, we see the Norwich centre back attempt to bypass Stoke’s press by launching it long into the wide player on the left. Again, Stoke’s man-to-man press is waiting for exactly this, and right-back Sterling launches in aggressively to intercept the ball.

So we see that there can be a slight change in specifics of the press, in this case Will Smallbone pressing forward alongside Brown in more of a 4-4-2 high block. We’ve also seen specific responses to opposition styles, such as Campbell dropping off and marking man-to-man to stop Blackburn’s inverted right back from overloading the centre of the pitch.

But even in these changes, the philosophy of Stoke’s press is the same:

  • Allow the opponent to play the ball into an area with curved pressing runs.
  • Press aggressively to force the opponent to make riskier passes through the press, towards their forward line.
  • Where strong, combative players are marking man-to-man, ready to win what might usually be 50/50 duels, but are now in their favour due to their skillsets.

It’s Only the Championship

Most impressive though, is the quality of opposition Stoke have been managing to successfully implement these brave principles against.

Looking at Championship form over the last 10 games, Stoke have beaten the 3rd and 6th most in-form teams (Coventry and Blackburn), and produced excellent performances, arguably deserving to beat the 1st and 9th most in-form teams in Middlesbrough and Norwich.

Most impressive, as those of you with Freeview may know, is possibly Stoke’s performance at home to high-flying Brighton in the FA Cup.

A 1-0 loss marred what was an exceptionally brave pressing performance against one of the most press resistant sides in the country, with Stoke following the principles outlined above.

Let’s take a look at a couple of examples.

Click each image to zoom in.

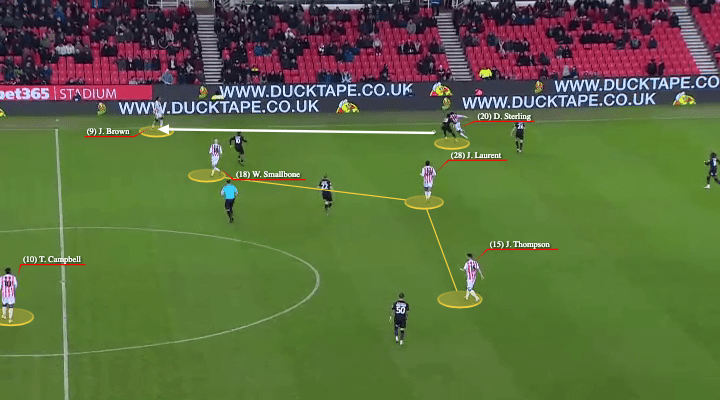
From a goal kick, Brighton play the ball short to a centre back, and we see that Stoke are set in a similar 4-4-2 high press to the Norwich game.

In this game, Ben Pearson, Will Smallbone, and Dwight Gayle were replaced by Thompson, Baker and Tymon respectively. You might expect Stoke to therefore change tact to alleviate the possible lack of cohesion, especially against an incredibly press-resistant team. But no, Stoke stick to the principles outlined above.

Brown presses the keeper with a curved run to block the passing lane back to the centre back. Baker pushes out to the player who then gets the ball off the keeper, aggressively pushing to force Brighton into riskier, line-breaking passes.

Click each image to zoom in

Trying to play out quickly and break the press, the Brighton centre back scuffs his pass, into the feet of the waiting Tyrese Campbell.

Now, as the ball turns over to Stoke’s hands, you can see one major benefit of the high press. Suddenly, Stoke have a 4v4 in the opposition box, against a disorganised defence.

Even more fun, in the last frame as Campbell gets the ball, we see centre back Axel Tuanzebe pushed 20 yards into the opposition half to track a player man-to-man who was dropping off to receive the ball.

You Can’t High Press All of The People All of The Time

But, sometimes good teams get through! So what do Stoke do when the pressure is on and they have to sit a bit deeper? Let’s take a look at an example or two to garner the back-up plan if the press doesn’t work, or if Stoke are holding onto a late lead and under pressure.

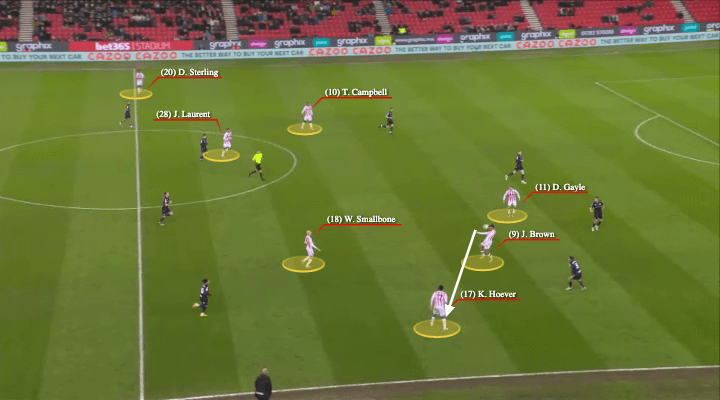
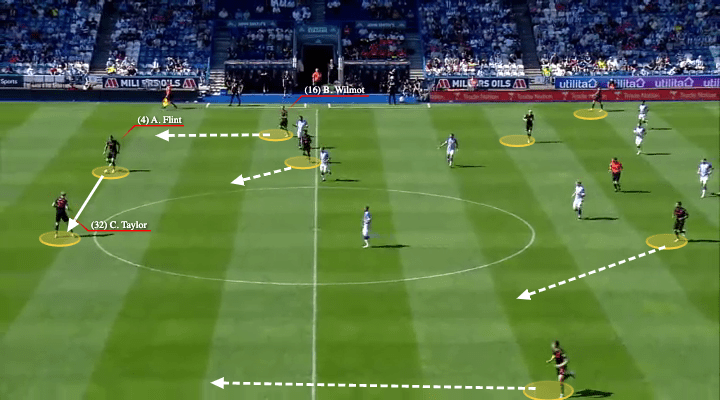
We start off in the 1-1 against Middlesbrough, as the opposition have the ball 35 yards from goal.

Image: Wyscout

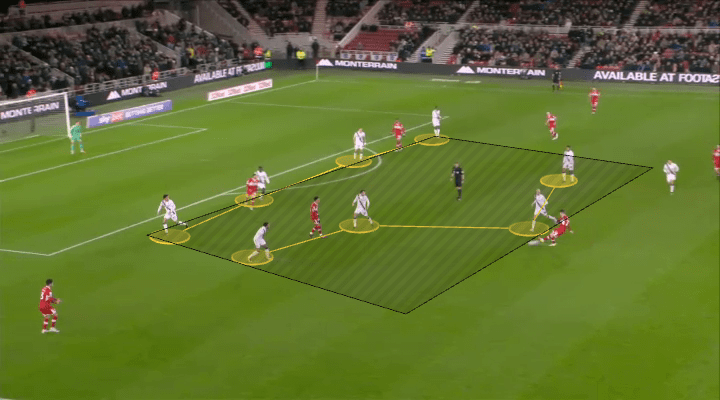
Se see that in this game, Stoke set into a pseudo-4-4-1-1 low block, with Brown dropping into a wide right role deep, as Gayle and Campbell stay forward on the break. Note that the ball is always under some pressure from a player.

But, most importantly, we see a principle that we’re very familiar with at Stoke off the ball. The area covered by Stoke defensive players is compact, narrow, and defending the centre of the pitch first and foremost.

When the ball pushes wide, thanks to Stoke’s narrow block, they can then contract space by pressing the ball more aggressively, using the touchline as a blocker and keeping the ball away from goal.

In this position, the right or left hand side of Stoke’s team can double up on the wingers to stifle the attack.

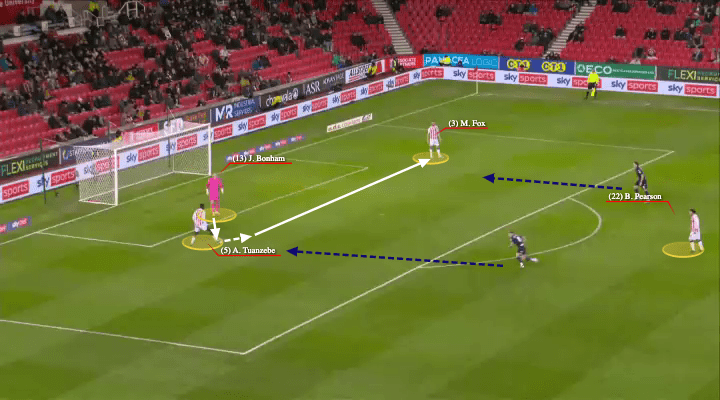
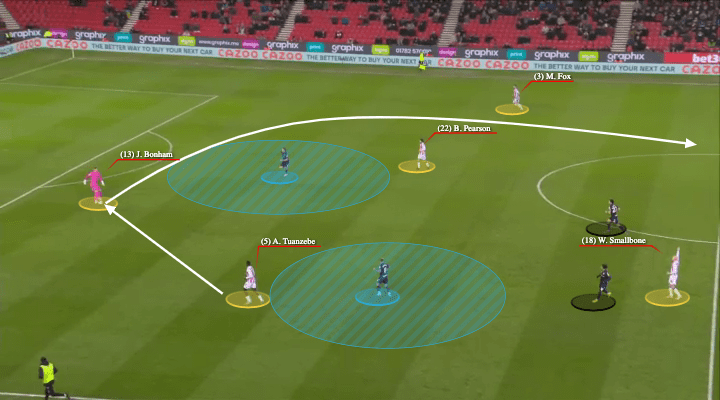
Similar positions are seen in this image from the 5-1 victory at Sunderland.

Image: Wyscout

This time, the ball is wide left of the Sunderland attack. We notice that Ki-Jana Hoever has pressed the ball aggressively, and as such, Ben Pearson has dropped into the right back position, Smallbone has dropped into defensive midfield, and Brown has dropped centrally into Smallbone’s initial role.

This cohesion is an incredibly important factor in Stoke’s consistency in defensive work.

The narrow, compact pseudo-4-4-1-1 remains, and the ball is still always under pressure by at least one defending player.

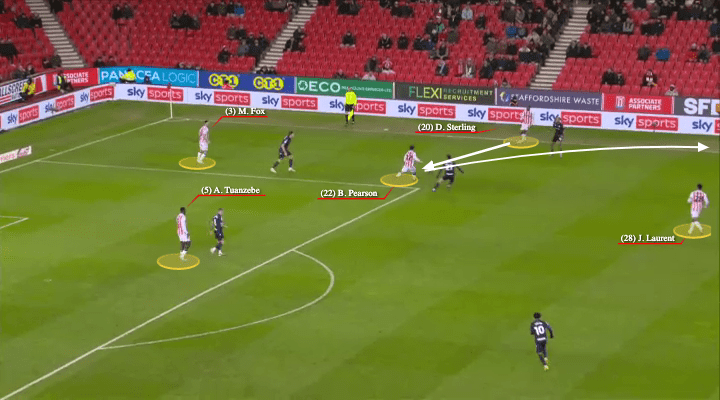
Stoke block out the central areas just on the edge of the box, and again force the ball wide into areas easier to defend, and away from high-value chance areas centrally. This is an expansion of the work Sean Dyche described in his fantastic Coaches Voice interview (see here: https://www.youtube.com/watch?v=o3YY7PY-IH0&t=399s) in protecting the zone of maximum opportunity, a v-shape from the goal to the corners of the box, and then lines parallel to the touchlines extending out from the corners of the box towards the half-way line.

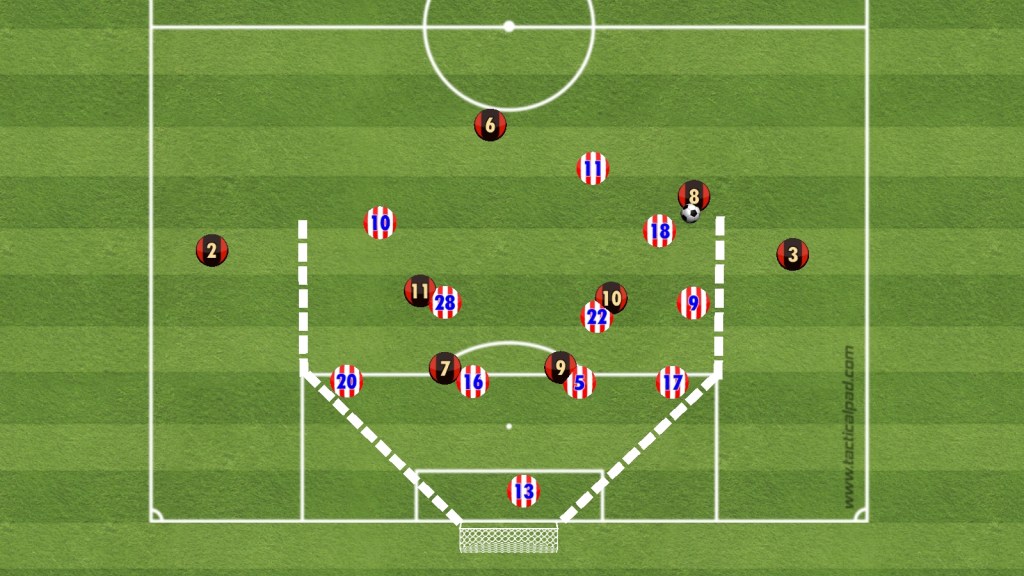
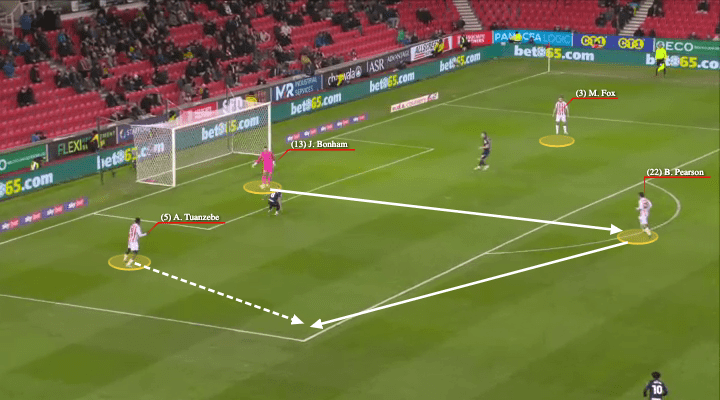
In this (crude, sorry) scenario, Stoke’s opponent has the ball outside the box, and while Smallbone presses the ball aggressively, the unit behind him sits protecting the area between the dotted lines. These lines show the zone of maximum opportunity, in the most dangerous areas for chances to occur.

So, there we have it! The basic principles of Stoke’s off the ball work, and hopefully some signs that the current performances could continue for quite a while yet.

Next up on Potterlytics, I’ll be delving into the work on the ball in build-up and chance creation. Follow this link to take a look. https://potterlytics.blog/2023/04/07/anatomy-of-a-10-game-revolution-part-2-the-on-ball-boogaloo/

Thanks to any and all readers, and please feel free to comment and follow on Twitter at @potterlytics.

Should you wish to donate to help with the running costs of the site, and the data subscriptions we use, please feel free to visit our donations page here. Any and all help is very much appreciated!

George

The Revolution Was Televised – Alex Neil’s 4-3-3 vs Blackburn

Well, that was a lovely Friday night, wasn’t it?

Stoke finally seemed to, for 85 minutes at least, throw off the shackles of their home form and throw aside the curse of the game after a good performance.

A 3-2 win didn’t reflect the dominance Stoke had over the course of the game, but 4 wins from the last 6 league games does reflect the progress they seem to be making over the first few months of 2023 under Alex Neil.

The newly-found 4-3-3 of the past month or two has led to some of the most consistently promising performances from a Stoke side for several seasons.

But just what is this apparently refreshed Stoke side doing differently? What has caused this upturn in form?

Well let’s take a look at some of the characteristics we have seen, particularly in the last match.

Under Pressure

The most obvious change we’ve seen is how Stoke press their opposition. The high press has been tried several times this season, but it’s only recently been getting the results to match the performances.

We saw, against Swansea, Stoke’s wide men pressing areas, ready to push up, while the central striker pressed the ball and the rest of the team marked man to man.

A version of this continued against Blackburn in some periods, but also often dropped into a more conventional 4-4-2 shape out of possession when pressure wasn’t so intense.

It’s nearly impossible to press aggressively, and high up the pitch for 90 minutes, so Stoke’s calmer out-of-possession shape allowed them to remain compact while retaining energy and still providing chances to win the ball back.

Interestingly enough, in the early periods of the game, Tyrese Campbell was not pushed forward as aggressively as Brown and Gayle, and sat deeper in the half space, marking Blackburn’s inverted right back out of the midfield.

We see an example of this in the first minute of the game, as Blackburn’s keeper gets the ball from his centre back.

Click each image to zoom in

The Blackburn keeper holds the ball. Similarly to the Swansea game, we see Gayle pressing the ball directly, while Brown sets a trap for the ball to the left, and Smallbone marks the midfielder dropping deep.

As the keeper plays the ball out, however, we see the difference.

This time, Campbell isn’t marking an area like Brown on the right hand side. He’s dropped deeper to man-mark Rankin-Costello, the right back who has inverted into the midfield to create a numerical advantage and help play through the press.

As the ball gets moved to the left, Brown’s trap springs, and he rushes to press the player on the ball. Gayle moves to cover the space across the box, and Smallbone/Campbell continue their man-marking missions.

Again, the ball moves all the way across to the right, and Campbell remains on the inverted full back, allowing the centre back to bring the ball forward, whilst Gayle moves to press and the central passes are marked.

This switch in focus from Campbell kept the press from being overrun by passes through the middle, and allowed Stoke to keep the upper hand while Blackburn persisted with their patient possession.

Can We Build It (Yes We Can)

More interestingly, however, Alex Neil appears to have reintroduced the build-up phase that he binned off at half time against Sheffield United in January.

Particularly noticeable in the away game at Blackpool, Stoke have started to be much more patient on the ball with their defenders, in an attempt to draw out opponents.

The passing is, like the pressing, much more brave, and we saw the fruits of that bravery and confidence against Blackburn on Friday.

Let’s look at an example. Click each image to zoom in.

This is a goal kick around 10 minutes into the match. Bonham plays it to Tuanzebe who is barely outside the 6 yard box. He plays it across the box to Fox, who turns and lays it wide to Sterling.

At this point, Blackburn feel their trap has been set well, as Sterling is pressed and he is forced to play another risky ball inside to Pearson.

This is where Stoke’s bravery leads to rewards.

Pearson plays a lofted pass (note, lofted pass, not long ball or hoof) forward into Dwight Gayle, who has been occupying the space behind Blackburn’s press, against their back line.

Click each image to zoom in

As Stoke have bypassed the first line of the Blackburn press, there is now a large space behind Gayle.

He nods it back into that area for one of the game’s danger-men, Tyrese Campbell, to attack.

He drives into the open space, 50 yards towards the opposition goal, and lays it into Smallbone’s path, who has continued running in the space.

Smallbone hits the bar from the 1 v 1 chance, but this was a great example of Stoke forcing artificial transitions by slowing down the play at the back, and switching to high tempo play quickly to exploit the space behind the Blackburn press.

Whilst we’ve seen a lot of the traditional transitions mentioned above from Stoke in the past 6 or so games, we’ve not seen so much of this quality play from the back.

7 minutes later Stoke get another goal kick, and work a similar situation.

Click each image to zoom in

Again, Bonham takes a short goal kick to Tuanzebe, and this time Blackburn press much quicker to prevent the out ball.

Tuanzebe is forced to play the ball back to Bonham, who was calm in possession all game.

He plays the ball immediately into Pearson, who has dropped into the centre of the D, and this makes space for the ball back to Tuanzebe, in the corner of the Stoke box.

Once again, Stoke play a lofted pass into the front line, where Brown has dropped off a defender to collect.

Brown lays it back into the space behind the Blackburn press, where Pearson can play it left into Fox.

Stoke have created a large area of space down the left, and Campbell pushes forward with the ball where the attacks breaks down.

Both of these serve as a testament to Stoke’s improvement in playing through opposition pressing play, and specifically to their ability to create space against sides who put pressure on the back line in the last month.

While this type of build-up happened several times, Stoke also varied their build up significantly, playing lower tempo for longer periods when in the lead and in possession higher up the pitch, and playing the ball forward much quicker to give Blackburn more varied problems and generate threat from winning second balls high up the pitch.

Click each image to zoom in.

This time, as Bonham receives the ball from Tuanzebe, there is no worthwhile pass available for him.

A pass back to Tuanzebe would put him under pressure, and passes to both Fox and Pearson are blocked by the Blackburn pressing forward.

Instead, he hits the ball long, bypassing two lines of pressure and reaching Jacob Brown. Brown nods the ball to Hoever, who plays it inside to Smallbone and Stoke can break forward.

4 players begin charging in behind the Blackburn defence to create space and options for Smallbone, and although the move breaks down with his pass to Gayle, this type of build-up presents another problem for Blackburn’s defensive press and back line to deal with.

The greater the variety in how you break an opposition press, the more difficult it is for them to prevent your build-up play leading to chances.

Thanks to any and all readers, and please feel free to comment and follow on Twitter at @potterlytics.

Should you wish to donate to help with the running costs of the site, and the data subscriptions we use, please feel free to visit our donations page here. Any and all help is very much appreciated!

George

What a Difference an O’ Makes – How Stoke Have Changed Under Alex Neil

It’s been just over 6 months since Alex Neil took over from his predecessor at Stoke City, and it’s tough to pretend there have been more ups than downs during his tenure.

As we approach the reverse fixture of that fateful day in August when Michael O’Neill sealed his fate, I can’t help but wonder just how have Stoke City changed.

With John Coates’ clear fandom of Alex Neil, having tried to make him the manager in 2019, there appears to be a lot of trust in Stoke’s new style, and despite not having his own team just yet, we’ve seen some big shifts so far.

Let’s take a look into some of the stats to see what insights we can gain.

Everything’s Coming Up Milhouse

First off, we can take a look at how Stoke’s expected goals (xG, explainer here) numbers have changed over the course of the shift from Michael O’Neill to Alex Neil.

For this, we’ll use a plot of 5 game rolling xG/game for and against.

Since the start of 21/22, Stoke have been inconsistent, which is a surprise to no-one.

Big shifts in both xG for and xG against show a the numbers expected of a mid-table side. Add onto this that Stoke have been below-average at finishing and well below average in goalkeeping, and you find a lower mid-table outfit.

But, since the World Cup, Stoke have been steadily improving defensively, to the point where they are expected to concede a goal only once every 150 minutes.

There’s also been significant improvement in creative output over the past few games, but this is a shorter trend, more likely to be as a result of playing against some poor sides in Blackpool, Huddersfield, and Swansea.

Nevertheless, Stoke’s current output, if they can produce it even over half of a full season, is that of a side at least challenging for the play-offs.

Unfortunately, Stoke’s xG numbers are pretty far away from their results, and we can look at this through the finishing statistics below. The plot shows the finishing quality of Stoke (their non-penalty goals minus their non-penalty xG per 90 minutes) against the average quality of their shots (xG per shot).

In both of the past 2 seasons, Stoke have been underperforming their expected goals by 0.1 xG per 90 minutes, which in 2022/23 is the 4th worst value in the league.

We also get a peek into one of Stoke’s style shifts this season, as their average shot quality has reduced from 0.11 xG to below 0.09 xG.

Interestingly, we can see that although the average shot quality is lower this season, Stoke have been taking about a shot and a half more per game, possibly another hint towards the change in playstyle. This plot shows the xG per shot, against the number of shots taken per 90 minutes.

Maybe there’s a clue about origin of these changes in the way Stoke have been shooting in their creative stats.

Each of the following plots is compared with the other teams in the Championship in that season. The length of each bar (and the colour) represents the percentile rank.

Click on each plot to zoom in.

The major takeaway jumping out here is that Stoke are one of the most crossing-oriented sides in the league this season.

Although Stoke crossed more than average last season, this season they’ve been putting more crosses into the area than all but one side, and they’ve also increased the number of set pieces that lead to shots too.

The expected assists values are also increased, indicating that Stoke’s creative players are putting the ball into better areas more often for others, but the low xG from assists value shows they’re not being converted to high-value chances.

Interestingly, and probably a little surprisingly, we see that Stoke were very potent last season at creating shots from defensive actions (e.g. tackles, interceptions, and blocks), creating 20 shots over the season from their total 925 shot creating actions.

Personally, I’m a little uncertain of FBref’s definitions here, as it only includes the action directly before a shot. This means that a player making an interception and then playing his teammate through on goal does not count as a shot from a defensive action, so I’m going to keep away from using this in too much depth.

But, for reference, an example of this is Lewis Baker’s late equaliser away at Barnsley.

As the ball bounces out to Quina, Chester rushes in and nicks the ball forward. Baker rushes onto it and thwacks a strike into the far top corner.

We’ve built a little bit more insight into Stoke as a team who like to work on set pieces and get the ball into the box, as opposed to the Stoke of last season who preferred to pass into the box.

Return of the build-up phase?

Let’s take a look at the build-up, where we will see a much clearer view of the changes that have taken place.

Click on each plot to zoom in.

First off, it’s incredibly clear that 2022/23 Stoke are much, much quicker at moving the ball forwards. In fact, they attempt more long passes than any other team in the league.

Contrasting this with 21/22, when Stoke completed 15 fewer long passes per game, and almost 50 more passes, alongside almost 40 more short passes per game, we see a side that has moved away from calm possession play and into transitional football.

We can further cement this by looking at the average pass progression, a measure of how much closer the average pass gets to the opposition’s goal. Stoke’s has increased from well below to well above average between the 2 seasons, indicating a willingness to get the ball forward further with each pass.

We see a similar story in the ratio of touches Stoke take in the attacking third compared with other areas of the pitch, deemed our ‘Attacking 3rd Touch Ratio’. This has increased significantly since last season, indicating that Stoke take a larger portion of their touches in the attacking third, and therefore that they get the ball forward quicker.

We can see this in the differences between Stoke’s attacking build-up vs Huddersfield under Michael O’Neill in August 2022, and vs Huddersfield under Alex Neil in February 2023.

First off, Huddersfield away under O’Neill:

Click each image to zoom in.

We see here that as Flint receives the ball, he plays a short pass off to Taylor. Taylor then puts it across the line to Wilmot.

All the while, Stoke have a clear shape of a back 3 with Flint deeper as an emergency passing option, Laurent dropping into the 6 position, and the wing backs pushed up wide offering options in space.

Stoke move the ball back across to Taylor and put it out to Sparrow, who plays it back when pressured. Laurent then receives the ball and turns, moving into space and getting the ball wide to Tymon.

This patient passing, waiting for an opening, was a major part of Stoke’s build-up under O’Neill. But what are the differences this season?

Moving onto Huddersfield at home under Neil:

Click each image to zoom in.

In this case, we see Jagielka returning the ball to the keeper, Šarkić, as he is pressed by Huddersfield players. Šarkić immediately shapes to punt the ball long, but instead opts to pass forward to Sterling.

Already we’re seeing a big shift from the calm passing of O’Neill, and in this instance Stoke’s defenders have split much wider to allow the ball to be progressed more quickly. The wingers and full backs are wider to allow progression down the channels, and the midfield are more tightly bunched together to prevent a counter through the now-open centre of the pitch.

Sterling turns, takes on a challenge from a Huddersfield wide player, and plays it forwards again to Brown, who runs from the halfway line to the edge of the Huddersfield box. He plays a ball in to Gayle who miscontrols.

We see here the difference, Stoke shape up much more open under Neil in order to progress the ball quicker, and Šarkić is used as the spare man for possession, ready to play it forward quickly if needed.

The passes between defenders are far less frequent, and the ball moves forward very quickly.

That said, we have seen in recent matches a return of the build-up phase to Stoke’s play, and particularly vs Blackpool the centre backs would draw the press before playing incisive forward passes.

But we don’t always have the ball, and our work off it is just as interesting as on it. Or at the very least, if you’ve read this far then you may as well keep going.

Dr. Midblock or: How I Learned to Stop Worrying and Love the High Press

We turn again to our trusty radar plot to check how Stoke’s defensive work has evolved with the change in manager.

Click on each plot to zoom in.

A couple of big shifts here, but we can note that Stoke are actually a side who tackles efficiently but fairly rarely when adjusted for possession, across both seasons.

However, most interesting to me is the jump in what I have called the Tackle Depth Index. This measures the average 3rd in which tackles take place, and for Stoke this has jumped from about average to well above average since Neil’s appointment.

This indicates a team doing its defensive work much higher up the pitch, and the increase in both middle and attacking 3rd tackles, alongside a decrease in defensive 3rd tackles, further implies that Stoke are pushing their defensive line further toward the opponent’s goal.

When combined with this data, the increase in the number of blocks indicates a side that will put more bodies closer to opponents as they move towards Stoke’s goal, and we see that reflected in the PPDA numbers too, as below.

PPDA, or Passes allowed Per Defensive Action, refers to the number of passes a team allows the opponent to make before attempting a defensive action, such as a tackle, interception, or block.

This is a metric that gives an indication of the pressing intensity of the side. Although like all stats, it’s not perfect, it does provide useful insights.

Remember, a lower PPDA number indicates a team presses with more intensity, as they allow fewer passes before making a defensive action.

We can see that Stoke have managed to increase their pressing intensity, whilst at the same time slightly improve their defence.

This pressing has been really visible in recent games against Swansea and Brighton, where Stoke have been very efficient at setting traps for the opposition to play the ball into.

Looking at the Brighton game, Stoke are playing a far superior side who are incredibly adept at drawing a press and finding space to play through, but they more than held their own for large portions, forcing Brighton to play longer passes into their strikers or lose the ball in midfield.

We can see from the Wyscout data below that Stoke completed a lot of duels (and won more than 50% of them) in the opposition half and defensive third.

Duels vs Brighton Image: Wyscout

We can also see from the ground duels blow that Stoke competed for the ball a significant amount in Brighton’s half.

Ground Duels vs Brighton. Image: Wyscout

Stoke allowed Brighton to play out through the centre halves, and then set traps that took advantage of their athleticism to win the ball back when Brighton tried to progress through the lines. It was incredibly brave and something that had worked very well in the previous away fixture at Swansea.

Unfortunately, Wyscout don’t have access to the Brighton footage, but we can show the same process in action against Swansea below.

Click each image to zoom in.

As the ball is played back to Swansea’s keeper, Gayle starts to press. Brown and Campbell guard an area behind the wider centre backs, and Smallbone drops with the Swansea midfielder looking to find space.

As the ball moves out to the left centre back, Brown engages.

This, along with the close marking of passing lanes and players from Smallbone, Gayle, and Campbell, forces the Swansea player to go long.

As he goes long, Pearson is marking the wing back, and regains the ball.

As he does so, we see that Wilmot and Laurent were also closely marking players in the midfield, meaning any longer pass from Swansea would likely result in a duel in Stoke’s favour.

This mechanism of not necessarily tackling the opposition 1 v 1 immediately, but forcing them into an area and enticing them to play the ball in ways you want them to is crucial to a functioning pressing side.

Note here too how Tyrese Campbell is a core part of this press, which hopefully puts to bed the unfounded criticism he’s received for not working hard. You don’t have a press this efficient with a lazy player.

This combines to give us a summary of how much we’ve seen Stoke change since O’Neill left just over 6 months ago.

Conclusions

So, what can we gain from all this? What was the point of the last 2200 words?

Well, there was no point to it really, it’s just for fun, just a roflcopter landing on the helipad of life, as Barry Homeowner might say.

But, we can definitely gain insight into what Alex Neil has changed at Stoke.

We see a side that has ditched the slow patience of Michael O’Neill’s 352 low-tempo possession build-up in favour of moving the ball forward much more quickly.

We see a team much preferring to play in transition, and building up in such a way as to force those transitions from the opposition.

We also see a team much higher in their press, and much more crossing-heavy.

All this change despite Alex Neil not having his own players just yet, and despite many injuries dictating squad decisions. It’ll be very interesting to see what happens in the summer should Stoke survive.

Thanks to any and all readers, and please feel free to comment and follow on Twitter at @potterlytics.

Should you wish to donate to help with the running costs of the site, and the data subscriptions we use, please feel free to visit our donations page here. Any and all help is very much appreciated!

George